Cande has been in the gaming industry for about 5+ years, working as a Localisation specialist, and has actually worked with Eric Barone himself. However, it would be her burning passion for Stardew Valley that would see her work to produce her own content on this wonderful, whimsical title. She adores helping the Junimos, meeting up with pals in the Stardrop Saloon, and is no stranger to the Skull Cavern!
Stardew Valley has something for everybody. If you like animals, you can raise cattle or even have a horse. More of a growing-and-sowing kind of person? You might want to check out the game’s 40 crops and fruit trees catalog. You could skip all the farming, go fishing, or even take on your RPG adventure in the mines.
ConcernedApe was, in fact, so concerned with keeping everyone entertained that he even included a game for when you get bored of the game. If you head to the Saloon, you’ll stumble upon this arcade called The Journey of the Prairie King. This game is as addictive as it is challenging. So buckle up for a frustrating arcade gaming session.
Unfortunately, The Journey of the Prairie King will only be playable while the Saloon is open, which is nighttime. The expression “Make hay while the sun shines” does not apply here, fellow cowboys.
This guide will walk you through the consumables, mobs, and stages of the Journey of the Prairie King in Stardew Valley. Giddy up, partner!
Bottom Line Upfront:
You can finish Journey of The Prairie King in less than 20 minutes. This guide should take you less than five.
Still, if you’re just here for some general tips, here’s a 60-second version:
Items: collect consumables as they drop in the arena. They will come in handy.
Enemies: the ones approaching you should be at the top of your killing list; the rest can wait.
Arenas: each stage has 3+ arenas with a different layout. For most of them, you’ll find a safe spot at the center of it.
Merchant: after you clear some arenas, the Merchant will stop by to sell his goods. Ammo should always be your top priority.
Bosses: the first two bosses can be killed off easily if you have a ninja bomb. The third will require some upgrades from the Merchant.
Journey of the Prairie King Guide
General Tips
Stay on the Offensive Side
There are safe spots, but this is not a game you can beat by playing defensively. You need to get out there and shoot enemies before they swarm up around you.
You’ll never run out of ammo, so what’s stopping you from spamming that trigger? Never stop shooting and do your best to take them down.
Also, shoot diagonally by pressing two direction arrows at once, it’s the easiest way to get enemies.
Collect, Collect, Collect
You should do you best to not miss out on any collectibles or coins. They drop pretty often, so you won’t be able to stay still for most of the game. Unless you are absolutely going to die for that coin, go for it.
Don’t Hold Onto Power-ups
If you find the right moment to use a power-up, do it. As I said, collectibles come and go all the time, so there is no real incentive to hold onto them.
Not All Power-ups are Created Equal
Some power-ups, like the shotgun or coffee cup, should be used relatively soon after you get them. This will help you free up space for the more powerful ones like the nuke or the sheriff’s badge.
The Timer Doesn’t Matter
There’s a timer above your screen. It intimidated me the first time I picked up Journey of the Prairie King. Turns out you can ignore it altogether, so don’t let it bother you.
Save, Resume Later
As of 1.5, you can save your progress and pick it up where you left off later. Take advantage of this. Journey of the Prairie King is not an easy arcade game. I can’t tell you how many times I got frustrated and rage quit. If you’re just not having fun anymore, take a break and save your progress.
Items
Some random enemies will drop consumables. You can stack them up, but there’s a storage limit. It’s not that you’ll become slower like in Skyrim. But you won’t be able to pick more up when your inventory is full.
Item name
Effect
Coffee
Speed buff.
1 Coin
Adds one coin.
5 Coin
Adds five coins.
Shotgun
Upgrades your gun to three shots.
Ammo
Upgrades your gun to rapid-fi.
Wagon Wheel
Upgrades your gun to multidirectional shots.
Sheriff’s Star
Upgrades your gun to rapid-fire, three-way spread shot, and buff your speed.
Ninja Box
Teleports your character and stuns enemies.
Power Tablet
Turns you into a zombie that kills enemies upon touch.
Skull Nuke
Wipes the arena. But defeated enemies do not drop power-ups or coins.
1-Up
Grants one extra life.
Upgrades
Every now and then, a Merchant will make an appearance after you’ve cleared a level. Make sure to save some coins to buy some stuff from him.
Item name
Price
Effect
Boots
Tier 1: 8 coins
Tier 2: 20 coins
Increases your movement speed.
1-Up
10 coins
Grants you an extra life.
Gun
Tier 1: 10 coins
Tier 2: 20 coins
Tier 3: 30 coins
Increases your shooting speed.
Super gun
99 coins
Grants permanent shotgun spread.
Sherif’s Star
10 coins
Increases fire rate.
Ammo
Tier 1: 15
Tier 2: 30
Tier 3: 45
Increases your bullet damage +2, +3 or +4, respectively.
Stages
Stage 1
Enemies
Make sure you target whichever enemy is closest to you first, then aim for those who are the most dangerous.
Enemy Name
Behavior
Desert Lizardmen
You can one-shot them to death. The same could be said about you, though.
They follow you around the arena.
Lizardman Spikehead (original form)
It takes two shots to bring them down. They are also much faster.
They do not follow you around the arena.
Lizardman Spikehead (spiky form)
This is their weaker form, but also their most annoying one.
When in spiky form, the Lizardman Spikehead is immovable.
He also limits your free space to roam around the arena considerably.
Lizard Demon
A slow tank. It won’t go down easily, but it also won’t deal much damage.
Happy Gopher
A friend! Happy Gopher will merrily skip around the arena, killing every enemy he comes into contact with.
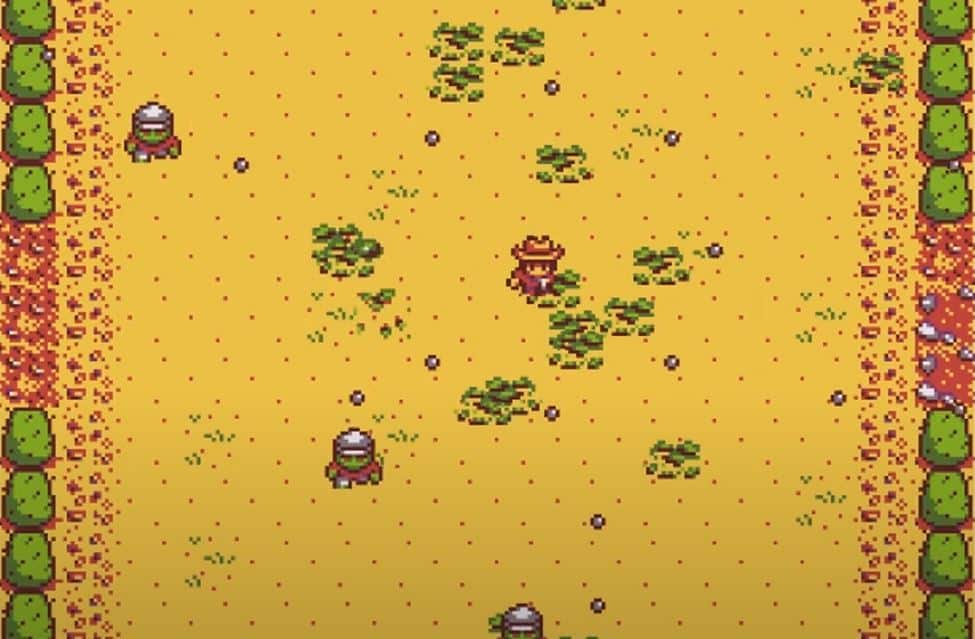
Area 1
Overview
Your very first area. Aren’t you excited?
It will take some time to adjust to the difficulty. But this is fairly the easiest arena of them all.
Enemies will spawn from the left and right middle portion of the arena.
It would be best if you stayed right in the center. After that, you’ll need to move left or right to shoot the Lizard Demons.
If some mouth-watering loot spawned and you can’t manage to stay permanently in the center, just avoid standing at the left and right sides. For a quick escape, use the power-tablet.
Aim for the coins, especially ones witht the 5, as they will come in handy for upgrades.
Area 2
Overview
The difficulty is picking up.
You’ll notice four barricades in the arena.
For this second area, we’ll switch strategies. You’ll start moving away from the center and hide behind these corners. This way, enemies won’t be coming for you from four sides, but two.
If you need to leave the corners to pick up a collectible, do so. Just make sure you are fully alert to return to your place.
Ka-ching! Once you’ve wiped all your enemies, the Merchant will pay you a visit.
If you’ve got the coin, you can buy the following items. Note that they have been listed in order of priority.
Ammo: + Firepower
Gun: + Fire Rate
Boots: + Speed
Area 3
Overview
This is a lovely barricade arrangement. Love what you’ve done with the place!
The barricades now cover the areas from which mobs spawn so they will have much more protection. Unfortunately, this means your center anchor works no longer, and you’ll have to move north and south every now and then.
You’ll also get a new company: Lizardman Spikeheads. Keep their mechanics in mind, and prioritize the regular Lizardmen over these.
Hold your place until the timer gets to 0.
Alternatively, if you prefer to play it more on the offensive side, you can hide behind the barricades’ corners and shoot diagonally. Lizardmen have trouble moving diagonally, so shooting this way works perfectly.
Area 4
Overview
The barricade is all over you now. It might seem scary, but it’s the best thing that could have happened to you.
If they want to get to you, enemies must go through those four holes alone. This makes your aim much more accessible, as enemies begin to clog the entrances.
Unless a coin or a collectible drops outside of the barricade, you should stay in. If you leave your safe spot, make sure you’re quick. The center of the arena is only safe when it’s not riddled with mobs, and if they start to get in, you’re in trouble.
If you prefer to be more offensive, you can lure them inside the barricade square and go trigger happy once they have swarmed inside.
You get to meet some new friendly and unfriendly people.
Friendly: Happy Gopher will storm the arena at random.
Unfriendly: The Lizard Demon will slowly but surely make his way into your safe spot.
Shopping time! The merchant will drop by again. Make sure you buy whichever upgrade you couldn’t get last time.
Boss 1
Overview
It’s a fellow cowboy! They don’t want to start a gang, sadly. Alas, murder is the only option.
You won’t run into any trouble if you keep the mechanics at hand. Here’s what the cowboy will do:
Take cover
Rush to the left. Fire non-stop.
Rush to the right. Fire non-stop.
Stand out of over.
These mechanics repeat twice.
5. Copy everything you do while firing.
6. Take cover and fire behind the cover.
Please take advantage of their openings. Your upgrades will help you defeat this cowboy with much more ease.
When he is down, he’ll drop a 1-Up. Grab it before the squirrel does.
TIP: Grabbed a Ninja Box? Just teleport to his side and blow his cover completely.
Stage 2
Enemies
Enemy Name
Behavior
Happy Gopher
A friend! Happy Gopher will merrily skip around the arena, killing every enemy he encounters.
Rush-Room
This little guy is fast and will gap close toward you. Place him on the top of your killing list.
Poison Moth
They fly all over the arena, coming from the north, south, east, west, or a combination.
Area 1
Overview
You’re halfway through there.
As you might have guessed, Journey of the Prairie King’s difficulty goes up a notch in Stage 2.
The first area is identical to Stage 1’s first area.
Instead of Lizards, you’ll be facing Rush-Room and Poison Moth.
With your ammo upgrade, you can one-shot Rush Rooms. So make them your priority. Poison Months can get annoying, but they aren’t as deadly.
The Merchant will come around for another round of sales. Get as many upgrades as you can. The speed boost is a must.
Area 2
Overview
The new vegetation feels like a breeze. But it will completely spoil your “anchor at the center” strategy.
Now, you’ll have no option but to move. That’s why the speed boost will come in handy.
If you need a safe spot to rearrange your mind for a second, get in between the lump and tree on your left. Rush rooms won’t be able to reach you as fast.
FYI: Trees won’t stop your shots, but lumps will.
Area 3
Overview
Like stage 4, the rivers and bridges make your job much easier.
As a general strategy, stick to the middle portion of the land and move left and right to shoot incoming mobs as they reach the bridge.
The rush rooms are clumsy. They get stuck on the bridge, so they won’t be able to reach you as quickly. Focus on the poison months instead.
If you see too many incoming enemies from the south portion of the map, move to the north. The same applies to the opposite.
You’ll be able to end this wave quickly when the Cheerful Gopher comes in.
Recommended item: multishot collectibles.
Boss 2
Overview
Big baddie number two incoming!
This cowboy also refuses to fulfill your Red Dead Redemption crossover fantasy. You know what to do.
This is just a shameless rehash of the first boss. Mechanics repeat in the same way but with a way heavier HP bar.
If you grab some upgrades, this fight will come in quickly.
Use your Ninja Box to enable what feels like god mode.
Stage 3
Enemies
Enemy Name
Behavior
Happy Gopher
A friend! Happy Gopher will merrily skip around the arena, killing every enemy he encounters.
Shambling Mummy
A bullet vacuum that won’t go down unless you have tier-3 guns.
Flying Demon
These foes swipe the arena with quick precision. Take them down swiftly.
Area 1
Overview
Stage 3 will take you to the grave. Quite literally.
There is one rule you can’t break: don’t stand between the tombstones.
You can, however, use them to your advantage. Stand behind them and shoot over them. This way, you can take cover from your enemies but deal damage.
You’ll enjoy the company of Shambling Mummies and Flying Demons. But they will come for your head, so you better get moving.
If you are not quick to take the mummies down, they will clump and fill the map in a matter of seconds.
Your trusty merchant will come around. But do purchase the boots; you’ll need them.
Area 2
Overview
Talk about inconvenient placement.
These tombstones will make this area one of the hardest in the arcade.
The mobs spawn mercilessly and tirelessly. There is just no time to breathe. So you’ll need to be quick and unload everything you’ve got.
Area 3
Overview
You’ll be quick to underestimate this area. But, trust me, you should not.
Both Mummies and Demons will be spawning non-stop. They will swarm around you in no time.
Here’s hoping you’ve bought all the ammo and gun upgrades from the Merchant. There’s no other way around this arena.
A good trick is to stick to the northern part of the arena and shoot the mummies as they come from the south. However, keep your senses peeled for when flying dragons start to come from behind you.
Speaking of which, your saving grace will pay you one final visit before the final boss. You know the drill, shop till you drop!
Boss 3
Overview
Contrary to what you might expect, the final boss is not a cowboy. It’s a Necromancer Zombie.
While it’s a nice change of pace, he’s got unlimited firepower.
Let’s break down his behavior:
1. Necromancer Zombie sticks to the side and fires straight at you.
2. He’ll sometimes move to the center and deal arena-wide damage.
3. He is a Necromancer. So when his health is below 25%, he’ll spawn random enemies.
Phase 1: Regular Shoot-out
Strategy 1
Move while he’s on the side of the arena. Then, when you see him moving toward the center, grab a potshot to protect himself from the bullet fire.
Strategy 2
Move around the arena while you shoot him, only stopping when he moves to the center. Then, stand in one of the corners and shoot him diagonally.
Phase 2: Summoning Enemies
When Zombie Necromancer spawns these random mobs, he won’t be firing as much. So as intimidated as you might be, this is your chance to approach and finish him off.
How to Get the Fector’s Challenge
The catch in the Fector’s Challenge achievement is that to get it, you have to beat the game’s ten levels without dying once.
Resetting Your Energy
Considering how much our energy plays a factor in the game, it can get frustrating to keep dying because you need to rely on enemies to draw power-ups or coins. Luckily for you, since patch 1.5, there is a reliable method of progressing through the game. When you beat the level, the game saves your progress and allows you to continue playing from that level.
You can beat one level at a time without dying. When you get to the next level, you quit the game and then go to sleep to save your progress. After that, you continue playing on the next in-game day.
The Merchant’s Upgrades are a Must
Once every two rounds, the merchant will show up and offer you three upgrades. Remember that you should always try to buy something from the merchant when he shows up. The guy does not show up at random; he always shows up at the same levels. So if you don’t buy something when he pops up, you’ll ultimately miss an upgrade.
Pick up every coin you can, especially in the early stages, since they are more accessible.
Keep a Power-up Under Your Sleeve
Always have a power-up under your sleeve to escape incoming damage. Ideally, it should be the best power-up you have. If you pick one that’s better, go for that one instead. Here’s my personal ranking:
Sheriff’s Badge: this power-up can get you out of any situation.
Cartwheel: the gunpowder the cartwheel packs will wipe out any enemies surrounding you.
Heavy Machine: a lifesaver with less coverage.
Shotgun: another lifesaver with even less coverage.
Smoke bomb and Tombstone: a temporary fix that causes more enemies to spawn.
Coffee: you can quickly escape a bad situation if there is an exit.
Nuke: the nuke will save you but won’t let enemies drop power-ups.
1-up: you are not supposed to die in the first place, so this one’s useless.
What Your Stage by Stage Progression Should Look Like
If you want to earn Fector’s challenge, you’ll need upgrades. This is how your upgrades should look after each stage.
Stage 1:
The first stage is your money-farming machine. You should be fully accustomed to its difficulty now, so you should exploit it for coins.
Coins: 25+
Upgrades: Ammo+1 and Gun+1
Buying the first Ammo upgrade in stage one. If you can’t manage it, you should restart it here.
Stage 2:
Make sure you grab the following upgrades to avoid making stage 3 your own personal hell.
Coins: 50+ Upgrades: Gun+2 and Ammo +2
Stage 3:
Before reaching the final boss, you should have the following upgrades:
Upgrades: Gun+3 and Ammo+2
Boots are also a good plus, but not required.
FAQs
Question: When does the Saloon open in Stardew Valley?
Answer: Gus will open the Saloon daily at noon. He’ll close at midnight.
Question: What are the rewards for beating The Journey of the Prairie King in Stardew Valley?
Answer: If you beat the Journey of the Prairie King, Gus will gift the arcade machine to you. That means you get to place it in your house and boast about your arcade skills to all your guests, spouse, and children.
Question: How do I get the Fector’s Challenge achievement in Stardew Valley?
Answer: The Fector’s Challenge achievement is rewarded to those who can complete The Journey of the Prairie King without getting hit even once. Arcade deities, the lot of you!
Parting Words
The journey to becoming a Prairie King is indeed a tough one. However, Stardew Valley always rewards its bravest players with the best achievements.
How’s this for motivation? If you get the Fector’s Challenge, you’ll be amongst the top 0.7% of Stardew Valley’s players. Or at least those interested in partaking in this fun, engaging, and admittedly frustrating adventure.